Wednesday, November 8, 2017

How to Dye Pasta 101

Hi there,

We are knee deep in learning about Pilgrims and Native Americans.  How about you?  As a culmination to our study of customs and traditions, we are going to have our annual "Thanksgiving Feast" out in our pod the day before we get out for Thanksgiving break.  One of the things we will do before hand is make our costumes, and the kiddos will get to choose whether they want to dress up as Pilgrims or Native Americans.  They will all get to make the infamous dyed pasta pattern necklaces that we have been making in my class FOREVER!  How many of you still make them?  If you are new or fairly new to teaching, do you even know what I'm talking about?  I bet you probably remember making them as a child yourself!  Since I'm sort of an old pro at this, I thought I'd take a few moments to give you a lesson on how to dye your pasta--just in case you've never done it before.  So, here goes:

First, be sure you buy any kind of pasta that has a hole in it, or would be suitable for stringing.  Well, maybe not tortellini stuffed with cheese, that might not be a great choice.  This year, I had to go to 3 stores before I finally found the "wheel" shaped pasta.  I finally found it at Kroger, and it was the DeCecco brand.  Don't they know that we kindergarten teachers need this stuff?  One year I found the cutest flower shaped pasta, but not this year.  No such luck.  

Next, you need the following items:

  • Rit Dye (I found mine at Jo-Ann)  You can also use regular food coloring if you prefer, but I find that the Rit dye has deeper colors and is more similar to the true colors of Native American times (at least that's what I tell the children!)
  • Alcohol
  • Large Zip-Lock Bags
  • A large piece of plastic to spread your pasta out to dry.  If it's nice outside, you can lay it out on butcher paper.  I also laid mine out on parchment paper so it wouldn't stick.  
  • Parchment paper (optional)
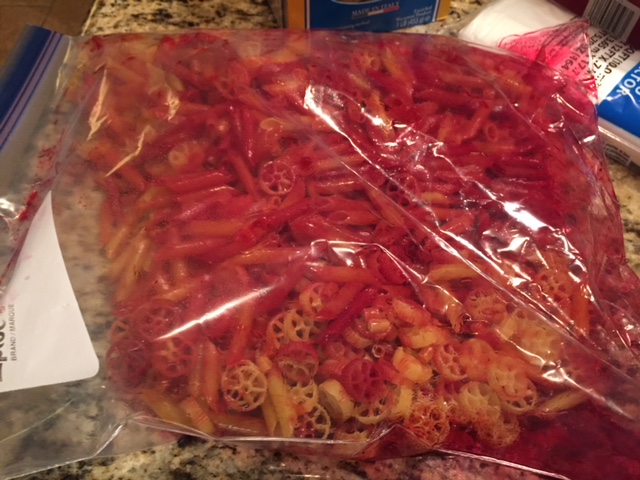
Once you have everything you need, it's really so simple to do.  Just lay out your plastic or butcher paper.  Too bad I didn't do this last week when we had record 90 degree temperatures here in Texas!  Today it's raining and 46 degrees--yuck.  So, I had to lay my plastic out in my garage.  Take a large Ziplock bag and put enough alcohol in it just to cover the bottom of the bag.

Now, add just a little bit of the dye.  I don't measure it, but I'd say it's about 2-3 tablespoons.  As you can see, it doesn't take much alcohol or dye at all!


Now it's time to add your pasta.  You can add several different kinds if you want.  I usually fill my bag about half full so that I can have room in the bag to mix it up really well.  Start mixing, and mix it up well by shaking it around and moving it around in the bag for a couple of minutes.  Be sure the baggie is sealed up really well!


When you are done, spread it out on your paper to dry, and repeat with as many other colors as you would like.  It's so easy!  Once it's dry, put it in a clean, new Ziplock bag for storage.  Boom!  Done!


Monday, July 31, 2017

TPT Back to School Sale!

Just letting everyone know that TPT is throwing a huge back to school sale, starting at 11 pm tonight, and I'm including all of my things in that sale!  Hop on over there and take a peek!  Thanks all! 


Saturday, July 15, 2017

Another successful Splash Conference and Study Buddies!

Well, another year of Frog Street Splash has come to a close.  It was a lot off hard work, ,but it sure was fun!  I want to say a huge thank you to all who came to my sessions.  I appreciate you coming so much, and I hope you were able to take away a few new ideas to use in your classroom this coming year.  As I shared with you in my session, one of my new faves this past year was the addition of these cute little "study buddies."  I needed something to help the kiddos keep their eyes on their own papers during writer's workshop and during benchmark testing, etc.  So, I found these presentation boards at the Dollar Tree, cut them in half on our school's paper cutter, and then added some cute Duck Tape/duct tape around the edges and VIOLA! There you have it--cute little "study buddies" that only cost a few dollars.  Now, when I introduced these, I didn't say, "OK you guys, you have been copying each other and that needs to stop!"  I just put them over to the side of our writing table, and one day I told them that I had these great study buddies that would help them be better writers because it would help them stay more focused on their work and give them more privacy.  Well, believe it or not, everybody wanted one!  I didn't even make that many!  So, we had to figure out a way to take turns with them, share them, and space them out in the room.  During writer's workshop, I encourage my kiddos to go wherever they would like to write.  Some prefer the table, some like the floor, some like to sit at the writing center, etc.  All this to say, the study buddies really did help during writer's workshop, and they turned out to be one of my favorite classroom additions this year!


Sunday, September 28, 2014

Rekenreks--New and Improved!

Well, another school year is off and running, and once again, I had the best of intentions of doing better at blogging.  Oh well...And so it goes.  Time escapes me once again.  I find myself wondering once again, what has kept me so busy? I'm not sure I will ever be able to answer that question.  

Anyhoo--I wanted to share my latest discovery about rekenreks.  I think I shared a while ago that I had made some and they were working out just fine.  However, by chance, I discovered a better way to make them.  It all started when I received my materials from Frog Street Press for the make and take session I did this summer in San Antonio (which, by the way, was a complete sell out!)  In making the rekenreks for my session, I discovered that they turned out even better than before, so I wanted to share that with you.

When I constructed the first ones, I put the pipe cleaners directly into the foam board, which meant that the pipe cleaners were taped down on the back, and they showed.  This time, I started with a cute name plate (there are so many to choose from!), and THEN I mounted them onto the foam board with hot glue.  The last step was taping the edges with duct tape.  I went with a name plate that would match my Rock Star themed room this time.  Also, I decided to make them all exactly the same.  I don't know about you, but if you have several to choose from, the kids will always want to be selective about which one they choose!  So now, I don't give them a choice, because they all look just alike, and time is saved when passing them out!  

Another tip I wanted to share this time is putting the little happy face sticker in the top left-hand corner.  Sometimes the kids want to tell you the way they made their number by starting on the right and moving toward the left.  I guess this would be OK, but I really want them to proceed from left to right, just like we do when we read.  So, this way, having the little smiley face helps them to remember where to start.  

Here are a few pictures to help give you an idea of how I constructed them this time:


It is my goal in the near future to make a little video that shows you how I use my rekenreks during our "Math Talks."  So, stay tuned--but don't hold your breath! 

Thursday, July 10, 2014

Shake and Share Math Station--differentiated!

Two posts in the same week--I'm even surprising myself!  Just wanted to get another thing posted before my presentation at Frog Street Summer Splash next weekend.  Where in the world has the summer gone??!!

Anyhoo, I LOVE the Shake N Share game that I first found when perusing through the awesome math games created by Shari Sloane.  She does have some really great ones, by the way.  I love using the small water bottles and the tiny dice for mine.  The kids love this game so much, so I wanted to find a way to differentiate so they can play it more often in math stations.  Sometimes I use it as a "have to" station, and sometimes I use it as a "get to" that they may do once they have completed the other station in their tub. (I have now moved to true "partner games during my math workshop block, so only two students are at a station at a time.  Each tub has two activities--the "get to" and the "have to".)

I have several recording sheets so that you can differentiate when using this station.  First is just number recognition.  There are also recording sheets for 2-digit addition, 3-digit addition, and subtraction.  Just be sure that when the students subtract that they always write the bigger number first.

Here are a few pics of a few of the bottles that I will be giving away as DOOR PRIZES at Splash--I especially like the little "test tube" ones.  They are actually from Frog Street's catalog, but they are also available from Steve Spangler.


If you would like the little recording sheets I created, just click here:


https://drive.google.com/file/d/0B7-XmG7SkkblUEZKeWVyMW01b0E/edit?usp=sharing

Hope to see you in San Antonio next weekend! 


Wednesday, July 9, 2014

FROG STREET SPLASH!

It's hard to believe that Summer is half over already. It always seems to fly by for me.  I am gearing up for a fabulous and fun weekend in San Antonio for the Frog Street Press Annual Summer Splash conference (July 17-19), and I'd love for you to join me.  I will be doing a couple of Make and Take Sessions on Thursday afternoon, and then presenting a session on workstations on Friday.  Thursday afternoon we will be making some of the cutest Rekenreks you've ever seen, along with some other super cute games and such featuring some Frog Street Press western packets.  Friday will be a jam-packed session filled with ideas, tips, and tricks for managing math stations and reader's workshop. It's not too late to plan to come!  Hope to see you there!


Tuesday, January 21, 2014

Crayons!

So, this post will be fairly short and sweet.  I just wanted to share an idea that I saw on Pinterest and show you that I have tried it, and it does, in fact, work!  You may have seen the pin that someone shared a while ago where she used plastic soap boxes for individual crayon cases for each student.  I have always just dumped all of our crayons into each supply box for all to share.  This can sometimes get tricky if all the students need to use the same color at the same time, so I thought I would give the soap boxes a try.  Well--I am into my second half of the year using them, and they are working like a charm! The original post was right--a box of 24 Crayola crayons fits perfectly in the soap cases (I got mine at Wal-Mart for .97 cents each.)  The kids love them, and they seem to make life easier, along with allowing the students to keep up with their own crayons.  Now, there are times when I find crayons lying on the floor or on the table, and of course no one wants to claim them.  When that happens, they are picked up and put into a large crayon box on my teacher table.  If someone is missing a particular color, he/she just goes to the big crayon box and finds the necessary color and puts it in his/her own box.  How easy is that?  Here are a couple of pics to help explain: 


Also, I give each student a fresh box of crayons at the beginning of the year, and then again in January.  When they get the new box in January, I explain that I KNOW that they are now more responsible, so I know that they can do a better job than they did before keeping up with their crayons.  So far, so good!

Can I just close with one question?  Why is it that the BROWN and RED crayons are always the ones that seem to disappear into thin air?  If anyone knows the answer to that question, please let me know!

Tuesday, January 7, 2014

Happy New Year!

So, once again, here I am having had the best intentions about blogging, and not getting it done like I promised.  Isn't that how it goes?  The Christmas season was super duper busy for me, as I was part of a Christmas production at my church that took up a huge chunk of my time.  The Gift of Christmas is probably one of the largest productions in the country, if not THE largest, and although it's so much fun to be a part of it, it wore me out!

Anyhoo, I wanted to show you how cute my door and wall are for the winter.  I originally saw a picture on Pinterest, and then told my fabulous room moms that they could do whatever they wanted to on my door and outside wall.  I think it turned out ridiculously cute, don't you?

Here are a few pics:


Stay tuned--I promise that I am going to do better this year about staying connected and posting more!

Saturday, November 2, 2013

Gone Batty!

Hard to believe that the first nine weeks of school flew by without me blogging one single time.  That's the kind of year it's been so far--crazy busy!  I'm sad that there hasn't been time to write more, but I've been like a salmon swimming up stream just to keep up!  And, the sad news is that the upcoming months aren't going to be much better in terms of how busy I am.  Oh well, that's how life is, right?

I did want to share these cute little bats.  The students made them and then made words with the -at chunk to roll up and put inside.  I got the idea from Kimberly Jordano, so I can't take full credit, but I thought they turned out cute, and the kids loved making them.  

Here are a few pics of the finished products.  Enjoy!


Tuesday, June 18, 2013

REKENREKS!

Happy summer everyone!  I can't believe several things:

  • that we got out of school on June 8th--how late is that??!!
  • that two weeks of summer have already passed by so quickly
  • before you know it, it will be time to think about going back!
With all this talk about the new TEKS (for those of us in Texas), and the Common Core standards for the rest of you, we need to explore "rekenreks."  What is a rekenrek, you might ask?  It is a math tool for young learners, similar to an abacus.  It was first developed in the Netherlands, but it has recently hit the US by storm.  We will be using them extensively in our district next year.  So, I wanted to get a head start on mine.  I made them a couple of months ago, and I started using them in my class with great results.  The kiddos loved using them, and since it was the end of the year, they knew just what to do with them to make different combinations of numbers by composing and decomposing.  I can't wait to start using them at the beginning of the school year with my new crop of kindergartners to see how their little minds are going to open up!  

I saw several different examples of rekenreks made by others in our district.  But, some of them were bulky, others looked hard to make, and some even looked expensive.  I decided to design my own, and I love how they turned out. Here are some pics:


The first pic is my teacher one.  I used black foam board, just to make mine look a little different from the kids'.  I used a nail to poke the holes, and I used a very thick yarn to keep the beads from sliding all around. (In one of the videos I watched, the teacher had to keep holding the beads down because they were sliding all around, and I didn't like that.)  The beads are 
1 1/2 inch beads that I got from Jo Ann.  I just spray painted them so they could be two different colors.  (A word of caution: Be careful when purchasing your beads--the first ones only had a hole on one end--they were more like a finial!) I just tied the yarn tightly to the back and then used packing tape to secure it further.  Then, I went around the edges with cute duct/duck tape, and I added another piece of yarn at the top so I could hang it on my board.

The next 3 pictures show the student ones.  They are roughly 4 inches by 11 inches.  It just so happened that the foam board I got had those ghost lines on the back, so once I did one, it was easy to count the squares so they were evenly spaced every time.  Again, I punched holes with a nail, and then I used pony beads and pipe cleaners.  I pulled them tightly and taped them down with clear packing tape and went around the edges with duct tape. They feel very sturdy, but time will tell.  Kindergartners can usually find a way to tear anything up that you have! 

I made a class set of these, plus a few extra, so I should be good to go in the fall.  

One more thing--I was at a training yesterday, and we talked about rekenreks a lot.  Did you know that there is even an app for that???  There is!  Just put "rekenrek" in your app search, and there it will be.  And what's even better is that it's a FREE app!  

Hope you have fun making your rekenreks!  Let me know if you have any questions about how I made mine.  I'd be happy to try to help.

Sunday, April 28, 2013

Ribbit!

Check out these cute little froggies we made this week.  It was our turn to make a project for our local nursing home, so since we have been studying life cycles and oviparous animals, these cute little guys fit right in.  We started with 12 X 18 construction paper, and then trimmed it to a 12 X 12 piece and a 6 X 12 piece.  The 12 X 12 piece gets cut into a circle, and the 6 X 12 piece is used to trace the kids' hands.  The hands become the feet of the frog.  Next, we used a white oval and a slightly smaller black circle for his eyes.  Finally, we cut  2 X 12 inch strips of red for the tongue.  It worked great to roll it on a pencil to make it curly.  The kiddos put the froggies together, added a nose and a mouth, then added cute messages for our friends at the nursing home.  They were super simple to make, and the class enjoyed making them!  Thanks to my awesome teammate Mary Brown for the idea!


Tuesday, March 19, 2013

Goodbye Static Electricity!

Why does it always happen that I get so busy that I run out of time to post on my blog?  I feel so bad that it has been so long---AGAIN!  But, here I am apologizing and wishing I had done a better job of keeping up.  I am going to try my darndest to keep going and be more consistent.  I always have the best intentions--I promise!

Anyway, the reason for this blog is to share with you what I feel like is a very important tip!  Get ready, because I feel like this has changed my life (well, not really, but it is still good to know info)!

Here is Helpful Hint #367:
Ever have a terrible time cutting out lamination because of static electricity?  Especially in the winter time--oh my goodness!  That stuff is everwhere, and my husband finds it all over the house. Honestly, I think it's worse than finding Christmas tree needles on the floor in the house 6 months after Christmas! 
I was racking my brain trying to think about how I could stop the static.  I tried rubbing dryer sheets all over my scissors and lamination, but that proved to be a ditch effort.  So, I was in Target one day, on the laundry aisle, and I spotted a can of Static Guard.  I thought to myself, oh well, why not try it and see what happens?  Well, lo and behold, it worked like a charm! All you have to do is lightly spray over the front and back side of your lamination AND the scissors.  It works great!

Check out the pic, just so you can see what the can looks like.


By the way, isn't that a super cute leprechaun 10 frame game?  Got it as a freebie on TPT!

So long for now--let me know if you have any other great ideas for getting the  static out of the lamination.  For now, for me, it's Static Guard to the rescue!

Monday, January 21, 2013

Snowman Making Words Activity

Today's post is a really short one:

I think this activity was one of my favorites so far this year. We did a snowman making words lesson, but we also made a snowman!  I have done the making words part of the lesson for years, but my fabulous new teaching partner, Annie, made this cute snowman  pattern, and I just had to do it too!  The kids really enjoyed making their snowmen, and once we finished making the words, they got to glue the letters onto his hat.  Here are a couple of pictures of the finished products.


Saturday, January 12, 2013

HAPPY NEW YEAR!

Wow!  It's amazing to me how time flies when you are staying busy!  I cannot believe how long it's been since my last post, but the holidays were super busy for me.  Hopefully I can slow down some and post more in the upcoming weeks and months. 

I wanted to share a super cute New Year's activity we did this week.  I can't take full credit, because I got the idea from a fellow blogger.  Her blog is called The Sharpened Pencil, so check it out if you get a chance!  Anyway, we made these little faces with party hats, then added a party horn.  On the hat we wrote our New Year's Resolutions.  First, we discussed what resolutions are, and many of the kids had heard their parents talk about them.  We have been working really hard at my school this year on increasing our vocabulary, so instead of writing, "My goal is...", we wrote, "I resolve to..."  Everytime we use big words in our school, we all say, "WORD!" and hold up 3 fingers to make a "W".  It's been really neat to see their vocabularies increase, especially in kinder.  Our favorite word by far in my class has been "savvy."  Everyone just loves this word and they use it in their writing almost daily!  Ok...so I diverted a little...back to our projects.  I am going to post several pictures so you can get an idea of how they turned out.

My bulletin board out in the pod...


                            Carter said, "I resolve to be a better basketball player."


                                           Neil said, "I resolve to be a better brother."
                                         

                                        Adam said, "I resolve to not lose a puzzle piece."


                  Calah said, "I resolve to be the best tiny titan in the school!

It's kind of hard to see the background of the hats, but I used scrapbook paper, and the hats were really cute.  I hate that you can't see the prints very well...

My next post will be a super cute making words activity we did this week.  Stay tuned...