
We are knee deep in learning about Pilgrims and Native Americans. How about you? As a culmination to our study of customs and traditions, we are going to have our annual "Thanksgiving Feast" out in our pod the day before we get out for Thanksgiving break. One of the things we will do before hand is make our costumes, and the kiddos will get to choose whether they want to dress up as Pilgrims or Native Americans. They will all get to make the infamous dyed pasta pattern necklaces that we have been making in my class FOREVER! How many of you still make them? If you are new or fairly new to teaching, do you even know what I'm talking about? I bet you probably remember making them as a child yourself! Since I'm sort of an old pro at this, I thought I'd take a few moments to give you a lesson on how to dye your pasta--just in case you've never done it before. So, here goes:
First, be sure you buy any kind of pasta that has a hole in it, or would be suitable for stringing. Well, maybe not tortellini stuffed with cheese, that might not be a great choice. This year, I had to go to 3 stores before I finally found the "wheel" shaped pasta. I finally found it at Kroger, and it was the DeCecco brand. Don't they know that we kindergarten teachers need this stuff? One year I found the cutest flower shaped pasta, but not this year. No such luck.
Next, you need the following items:

- Rit Dye (I found mine at Jo-Ann) You can also use regular food coloring if you prefer, but I find that the Rit dye has deeper colors and is more similar to the true colors of Native American times (at least that's what I tell the children!)
- Alcohol
- Large Zip-Lock Bags
- A large piece of plastic to spread your pasta out to dry. If it's nice outside, you can lay it out on butcher paper. I also laid mine out on parchment paper so it wouldn't stick.
- Parchment paper (optional)
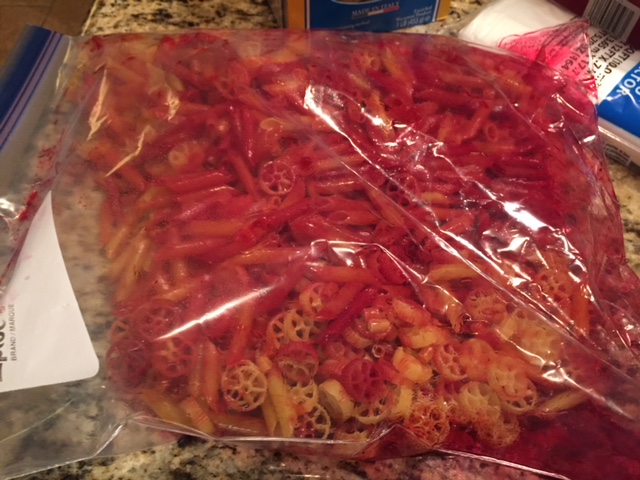
Once you have everything you need, it's really so simple to do. Just lay out your plastic or butcher paper. Too bad I didn't do this last week when we had record 90 degree temperatures here in Texas! Today it's raining and 46 degrees--yuck. So, I had to lay my plastic out in my garage. Take a large Ziplock bag and put enough alcohol in it just to cover the bottom of the bag.

Now, add just a little bit of the dye. I don't measure it, but I'd say it's about 2-3 tablespoons. As you can see, it doesn't take much alcohol or dye at all!

Now it's time to add your pasta. You can add several different kinds if you want. I usually fill my bag about half full so that I can have room in the bag to mix it up really well. Start mixing, and mix it up well by shaking it around and moving it around in the bag for a couple of minutes. Be sure the baggie is sealed up really well!

When you are done, spread it out on your paper to dry, and repeat with as many other colors as you would like. It's so easy! Once it's dry, put it in a clean, new Ziplock bag for storage. Boom! Done!


